The Experiments Week 7: Beef with Broccoli

Beef with Broccoli

Tasty and Tender Beef and Broccoli

This could seriously not have been easier to make!!!  My whole family loved it and I wish I had made more for leftovers!  A super simple, pleasing dinner!

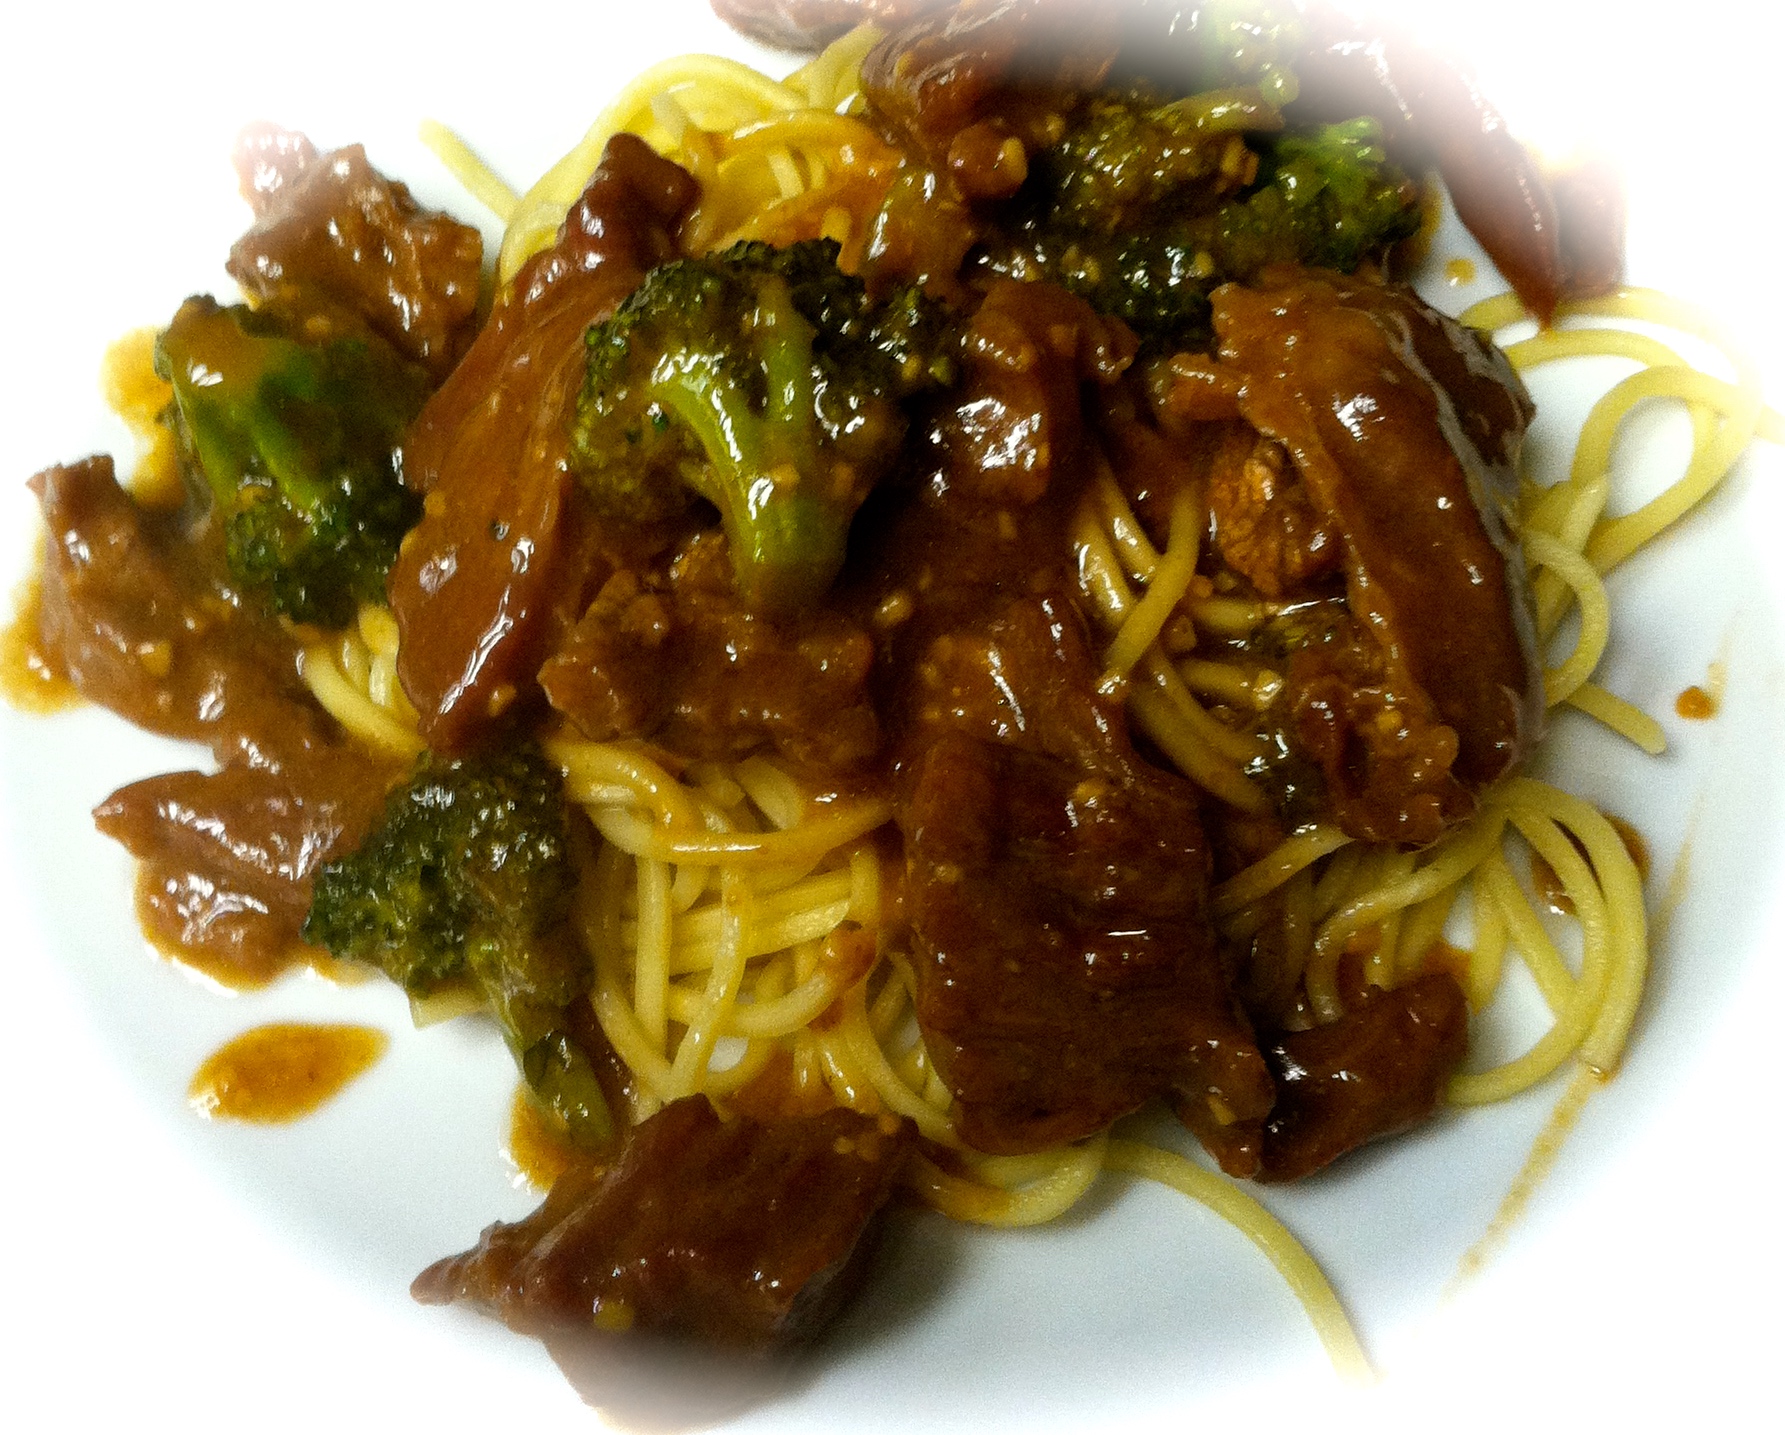
I opted to serve ours over a lo mien noodle (truth be told I found out I was short on brown rice minutes before it had to be prepared, bad planning on my part, whoops!)  The result was awesome and the family loved it with the noodles so it all worked out OK!

I guess the “hardest” part of the recipe is that you should marinate your beef at least an hour before you cook it.  It could be done the night before or several hours before if you prefer.

The ingredients to  marinate the meat:

1/2 tsp baking soda

1 tsp sugar

2 TBSP vegetable oil

1 TBSP water

1 TBSP cornstarch

1 TBSP soy sauce (I HIGHLY suggest using low sodium for the whole recipe as this can get salty)

1 1/2 to 1 3/4 lbs. of flank steak, slice this into small strips.

Mix together all the ingredients in a medium to large bowl and evenly cover the steak.  Cover the meat and marinade and put it in the fridge for at least one hour.

When you are ready to prepare dinner, give yourself about 5-10 to prep and 15 for cook time.

You will need these ingredients:

1/2 C soy sauce (again I suggest low sodium!)

2 TBSP brown sugar

3 TBSP of minced garlic from a jar or 4 Cloves

2 TBSP Wheat Flour

1 TBSP sherry

4 TBSP Olive Oil

2 cups broccoli crowns

Start by cutting your broccoli crowns into nice bite size pieces.

Then stir together your soy sauce, garlic, brown sugar, wheat flour (white is OK if you prefer) and sherry in a small bowl.

Heat on high a large skillet (or wok if you have one) with 2 TBSP of the olive oil.  Once it is nice and hot, add your broccoli for about 3-4 minutes, stirring continuously and then place it in a dish set aside for later.   You do not want this to get too soft as it will have some more cook time later, it will still be a bit crisp when you remove it from the wok and set it aside.

Add the last 2 TBSP of olive oil to the wok and turn the heat to medium high.  Add the marinated flank steak and about 1/2 the sauce mix.  You will want to saute the meat until it is not pink.  This should be about 5-6 minutes–but  trust your eye.  When ready, stir in the broccoli and add the remaining sauce.  You can turn down the heat a to medium low and allow it to saute another 3-5 minutes.

Serve with your choice of rice or noodle.

YUM!

This recipe will serve about 4 adults.

The Experiments Week 6: Southwestern Quinoa Casserole

SOUTHWESTERN QUINOA CASSEROLE

Southwestern Quinoa Casserole

Southwest Quinoa Casserole

This was some pretty good stuff! Easy to prepare and a nice option for a healthy but flavorful meal. It is a nice weeknight meat free option (can be totally veggie if you sub veggie broth for chicken). The quinoa is a healthy choice for those watching their glycemic load and it is filling!   The dish will serve 8 and makes for great leftovers!  I enjoyed it COLD after a run and found it light enough to not upset a sensitive post run stomach (13 miles yesterday:) and it is a great bit of post workout fuel! It would be great packed as a lunch as it could be eaten cold or reheated.  I love having a nice healthy easy lunch to grab at home and sending some good brain food with the kids to school.

Ingredients:

1 and 1/2 cups quinoa 

3 cups chicken broth (or 3 cups water and 3 TBSP chicken granules)

1 cup frozen corn 15 oz. canned black beans (drained)

6 to 8 ounce carton plain Greek Yogurt (or 3/4-1 cup) (the first time I made this I used 6 oz and it was less “wet” but the second time I used 8 and it was creamier and moister, both were good, it is a preference)

10 oz. can Rotel tomatoes, drained (I prefer the cilantro lime version)

1/2 cup salsa (a homemade or deli style rather than jarred is ALWAYS better, but not required)

2 cups Mexican blend cheese (this is one 16 oz package)

1 1/4 tsp. Paprika

1  tsp. Garlic Powder

1 tsp. Garlic Salt

1/2 tsp. Chilli Powder

OR use 1 TBSP or a taco or chili seasoning in place of the 3 spices above

Directions:

Place your quinoa in  1/4 cup warm water for about two minutes, stir to distribute water evenly.

Heat a large frying pan on high and add quinoa.  This should cook 2-3 minutes to allow the water to cook off.

Next, add the chicken broth and bring to a boil. Allow to boil 2 minutes then turn heat to low and let cook, covered, for 15 minutes.

Remove from burner and let stand, still covered, for 5 minutes.

 While the quinoa is cooking do the following:

Preheat oven to 350ºF.

In a medium/large  bowl, combine the corn, beans, yogurt, tomatoes, salsa, spices and 1 cup cheese and stir well.

Once the quinoa has finished, add it to the mixture and spread into a  9×13 inch pan (spray with nonstick spray first–generously as quinoa can stick). Top with one cup of cheese.

Bake the casserole uncovered for 28-30 minutes.  This will allow it to heat completely and the cheese to brown.  Remove it sooner if the cheese has browned as oven times do vary.

 NOTES:

You can substitute veggie broth for chicken to serve a meat free dish.

I prefer a spicy dish so we used a fresh hot salsa blend.  You may sample the blend before adding the quinoa to adjust spices to your preference.  I have seen variations of this dish with no added spices but that seems very bland.

I am going to add a bit of fresh cilantro next time, because, why not, LOVE the cilantro.

How do you feel about quinoa overall? If you are new to quinoa or tried this and found it too much quinoa to veggie ratio, consider adding 1/4 cup more of each veggie next time:)

 ENJOY!

Southwest Quinoa Casserole

Snack Experiment: Oven Free (No Bake) Energy Bites

Oven Free Energy Bites (No Bake!)

YUM!!  A sweet snack packed with protein, oatmeal, seeds, dark chocolate and honey!  No flour, no sugar...no OVEN required!
Oven Free Energy Bites (NO BAKE!) YUM!! A sweet snack packed with protein, oatmeal, seeds, dark chocolate and honey! No flour, no sugar…no OVEN required!

I have seen several variations on these “energy bites” and had to try my own take on them.

They were SUPER easy.  The thing is, good or bad, they tasted just like awesome cookie dough.  If you look at the ingredients, it is far healthier than cookie dough, but I would not go so far as to call it “health food”.  Nonetheless, I did find them a great filling pre and post run snack with lots of protein, fiber and carbs.  The bonus cookie dough taste has me eager to make another batch.

1/2 Cup Chunky Natural Peanut Butter (I used chunky to benefit from the peanut texture & natural to avoid the added sugar)

1/3 Cup Honey or Agave

1 Cup Uncooked Old Fashioned Oats

1 TBSP. Flax Seed

1 TBSP. Chia Seed

1 tsp. Vanilla

1/4 Cup Chocolate Chips

Add all the ingredients to a mixing bowl and mix well.

Place the mixture in the fridge for about 15 minutes to chill–it is easier to work with the “dough” if it is chilled.  Then, roll into balls or use a small ice cream scoop/melon baller to shape.  A handy reference, these should be about donut hole sized.

The up side of these, tasty!  My kids would think it just as great to set these out for a snack than a plate of cookies!  I may try to create them using an equal mix of dried cherries and chocolate chips next time.  For those who do not like chips, only dried cherries, no additions, or a peanut butter chip could work, too!

The downside is that these need to be stored in the refrigerator in a sealed container:(  They are great for pre and post workout, after school snacks, etc.  and in a lunch sack with an icepack, but they can not get too warm.

YUM!!  A sweet snack packed with protein, oatmeal, seeds, dark chocolate and honey!  No flour, no sugar...no OVEN required!
YUM!! A sweet snack packed with protein, oatmeal, seeds, dark chocolate and honey! No flour, no sugar…no OVEN required!

The Experiments Week 6: Steal the Show Cheesy Chicken Meatballs and Avocado Pesto Pasta

Recipe:  Cheesy Chicken Meatballs & Avocado Pesto Pasta

Avocado Pesto Pasta with Steal the Show Cheesy Chicken Meatballs

Found on: momwsweeklyrecipe.com

This was an interesting week as I had been planning to try the avocado pesto pasta for awhile and the chicken meatballs were a last minute “what would work with it” afterthought.  It turns out the pasta was just so-so and the meatballs were out of this world!  You do not taste cream cheese but you get a super moist delicious meatball, not at all dry as ground poultry can be.

Honestly, many of my family members liked the avocado pesto pasta too, it just did not wow me, but we could’ve eaten another batch of the chicken meatballs no problem!  The pasta just had A LOT of avocado flavor, you really have to like it to enjoy the pasta.

RECIPE:

Chicken Meatballs

1 lb. ground chicken

1 Egg

1/4 Cup Light Cream Cheese (I used a garlic herb for flavor)

1/4 Cup grated parmesan or a parmesan/white cheddar blend

1 TBSP breadcrumbs or crushed saltines or butter round crackers

1 tsp. crushed red pepper

1TBSP Italian seasoning

1 TBSP garlic power

1 1/2 TBSP Olive Oil

1 tsp salt

1 tsp black pepper

Preheat oven to 450 degrees, line a baking sheet with aluminum foil sprayed with cooking spray.

Combine the chicken, egg, cream cheese, parmesan cheese or blend, bread crumbs, red pepper flakes, Italian seasoning, garlic powder, olive oil, salt and pepper in a mixing bowl.  Use an ice cream scoop (or rounded spoon) to drop meatballs onto the pan.  This mixture should create 14-16 good sized meatballs.  I choose to add some pepper to the tops before cooking.

Bake in the oven for 18-20 minutes.  For those who prefer to use a thermometer center temperature should be 165 or more degrees F.

Uncooked Chicken Meatballs
Uncooked Chicken Meatball
Cooked Cheesy Chicken Meatballs

Avocado Pesto Pasta

1 large bunch of fresh basil (about 1 leafy cup)

2 large ripe avocados

1/2 cup Walnuts

1 1/2 TBSP Hemp Seeds (optional)

2 TBSP lemon juice

3 Garlic cloves or 2 TBSP jarred minced garlic

1/2 tsp sea salt

1/2 cup olive oil

1/2 tsp black pepper

Remove basil leaves from the stems and put them in the food processor with the avocados, walnuts, seeds, lemon juice, garlic and salt.  Once it is finely chopped, add the oil and create a thick paste.  Season as desired with the black pepper.

Toss with pasta.

Though I found the flavor a bit much for pasta, I would make and serve this again as a nice topping for bruschetta.

The Experiments Week 5: Sweet Garlic Chicken and the Brussel Sprouts You AND Your Kids will eat!

RECIPE:  Sweet Garlic Chicken and Brussel Sprouts
IMG_0073

Sweet Garlic Chicken and Brussel Sprouts Pictured with Rosemary Brown Rice and Quinoa

I was looking for a simple oven baked chicken recipe that would not taste dry and I found it!  On a whim, I thought, what if I toss my Brussel Sprouts in the same yummy sweet garlic sauce?  What if???  What if my kids actually were standing over the pan post dinner to make sure the leftovers were split evenly?  Brussel Sprouts?  Yep, that happened.

Ingredients:

3 Large or 4 Medium Chicken Breasts sliced in half and then into palm sized or close portions

8 Cloves or 6 TBSP Garlic from the Jar

7-8 TBSP Brown Sugar

4 TBSP Olive Oil

1 1/2 Cup Brussel Sprouts (small) cut in half

1 Cup Shredded Parmesan or Parmesan/white Cheddar Blend Cheese (optional)

Preheat your oven to 375 degrees.

Begin by slicing your Brussel Sprouts in half.  I like smaller Brussel Sprouts and you can get more flavor to veggie ratio:)  Add them to a mixing bowl.

Heat your 3 TBSP olive oil over medium and add the garlic.  You will cook this just until if softens and gets slightly browned. While this cooks, slice your chicken crosswise and then into palm sized portions (or close to it).  Place the chicken in a baking dish. I choose one where the chicken all touched but did not overlap so that it would all be immersed in the sauce.  I also (and I am glad I did) decided to line both my pans with foil and then a layer of cooking spray.  Brown sugar can get a  little sticky so it seemed like  a good idea.

When your garlic is ready, remove it from the heat and add the brown sugar.  Start with 7 TBSP (that is what I used) but you may add more if the sauce looks to runny.  Pour 1/2 the mixture over the chicken.

Raw chicken is not the most attractive thing, but here is a picture of my pan, sliced chicken and sauce.

www.momsweeklyrecipe.com
The Sweet Garlic Chicken Before Cooking

Place the chicken in the oven uncovered for 30 minutes.

Next, mix just over half of the sweet garlic sauce you have remaining (reserve a few TBSP) with the Brussel Sprouts to coat them.  Now lay them out on a baking sheet.  I opted to spray the tops with a bit of Olive Oil spray as well.

Sweet Garlic Brussel Sprouts www.momsweeklyrecipe.com
Stir the Sweet Garlic Sauce into the Brussel Sprouts
Sweet Garlic Brussel Sprouts www.momsweeklyrecipe.com
Layer the Sweet Garlic Brussel Sprouts on your Foil Lined Baking Sheet and top with a bit of Olive Oil Spray

You should be about 10-12 minutes into your chicken baking, this is a good time to add your Brussel Sprouts to the oven.  Your chicken will cook a total of about 40 minutes and your veggies about 28-30.

When your 30 minute timer goes off for your chicken goes off, remove it from the oven and add your last few tablespoons of sauce to the top and cover the chicken with your cheese.  Shredded parmesan is great, but I found an amazing cheese blend I used at Trader Joe’s. I recommend a similar. If you choose to not add cheese, that is OK too.  Once you have added the extra sauce and optional cheese, place the dish back into the oven for about 8 minutes.

Top the Sweet Garlic Chicken with the remaining sauce and cheese of your choice
Shaved Cheese Blend
The fun cheese blend I used from Trader Joe’s

When you have 2 minutes remaining, check your chicken and veggies.  If they look nice and brown, you can remove them.  I personally enjoy a little extra crisp in my veggies so I like to switch the oven to broil low and give the it 1-2 minutes.  This is optional if you feel your cheese is well melted and veggies are browned enough, you can skip it.

Here is what the Brussel Sprouts looked like when I removed them from the oven:

Fresh from the Oven! Sweet Garlic Brussel Sprouts
Fresh from the Oven!
Sweet Garlic Brussel Sprouts

I choose to serve this with a rosemary brown rice and quinoa that we like.  I knew it would have a sweet flavor so I was looking for something a bit savory to go with it.  A mild pasta, rice or similar would go well, too.  I think it would be fun to try the sauce with a red potato, carrots, green beans or many other side dishes if your family does not like the Brussel Sprouts (but I think they will surprise you)!

This one was a winner at our house!  Let me know how it goes if you try it at home!

12 Cup Muffin Pan Giveaway!

Would you like to win the 12 cup muffin pan giveaway?

12 Cup silicon muffin pan
Giveaway Number One! The 12 Cup Silicon Muffin Pan being given away on 2/9/15!

Follow the steps to enter today!  You can get one entry for liking our facebook page, one for commenting on our muffin recipes, and one per day for commenting on one of our  facebook posts or sharing it with your facebook friends!

The raffle is through Rafflecopter and it is the one way to enter.  Please click the Rafflecopter Giveaway Link Below!

a Rafflecopter giveaway

A Bonus Breakfast Post!

I have added my first breakfast post to the breakfast page!  I am planning on featuring a series of healthier on the go muffins over the next couple of weeks…

The first is this tasty blueberry muffin with wheat flour and vanilla almond milk.

YUM!

www.momsweeklyrecipe.com
Blueberry Muffins with Wheat Flour and Vanilla Almond Milk


The Experiments Week 4: WOWZER! Chicken (or Veggie) Tortilla Soup (Crockpot!)

Super Crockpot Chicken Tortilla Soup
Super Easy Super Yummy Super Tortilla Soup ! Perfect for your Super Bowl party!!

Found On: http://www.momsweeklyrecipe.com

Holy Cow! This was delicious!  It’s no mistake that I am using this recipe right before the Super Bowl!  It is the perfect warm, filling, tasty BUT healthy dish!  This was one of those weeks where experimenting was going to be tough, too little time and too much to do.  I remembered once attempting a similar soup and decided to make my weekly experiment improving on it…I did!

Are you ready for the BEST part???

I got all my ingredients out at 12:58, had it all in the crockpot by 1:13 and had my kitchen tidied up again by 1:16.  Except for the five minutes to shred the chicken hours later, that was IT! Talk about easy, you can even prep it the night before if you are rushed in the morning.  You won’t believe me until you try it because it looks way too easy.

Ingredients:

3 Large Frozen (yep frozen is fine) Chicken Breasts

1 3/4 Cup Frozen Corn

2 10 oz. cans diced tomato and green chili rotel

2 15.5 oz. cans of white beans

1 cup chopped carrots (about 8 oz)  (Again, I used the pampered chef food chopper to make them just the right size)

1 Cup chopped celery (about 3-4 stalks) (Cue food chopper again!)

I  or 1 1/2 package of Taco Seasoning  (I used original, but if you are spice averse, consider using mild).  I like to add a bit more spice near the end if needed for taste so I always have an extra packet on hand just in case!

4 Cups Chicken Stock (or make your own with 4 cups water and 5 tsp of chicken granules)

Optional (sort of):

Shredded Cheddar Cheese for topping

Tortilla Chips for crunching in or dipping:)

Place all of the ingredients in a large crockpot.  If you plan to serve in 5-6 hours, use the high setting and if you plan to leave it on all day, use the low.  About 1 hour before serving (if possible), take the chicken out, shred it, and then place it back in the soup.  If you do not have the full hour, it is ok, it’s just to let the flavors “mix” a bit with the freshly shredded chicken.

Shredded Chicken for Tortllla Soup
Shred the chicken into nice small pieces

Serving Suggestions:

Serve topped with shredded Cheddar and/or a side of tortilla chips.  If you have fresh cilantro to garnish, go for it!

This makes one full crockpot of soup!  It should easily serve 10 people a full meal, more if served with other munchies.  It will also freeze well or be awesome for lunch the next day.

If you would prefer a meat free soup, add an additional can or white beans and rotel and an extra 1/4 cup each of carrots, celery and corn.

I like to use all organic ingredients when possible, but it is not required for the recipe.